Watch the quick setup video above before diving in; it should make everything more clear!
How It Works
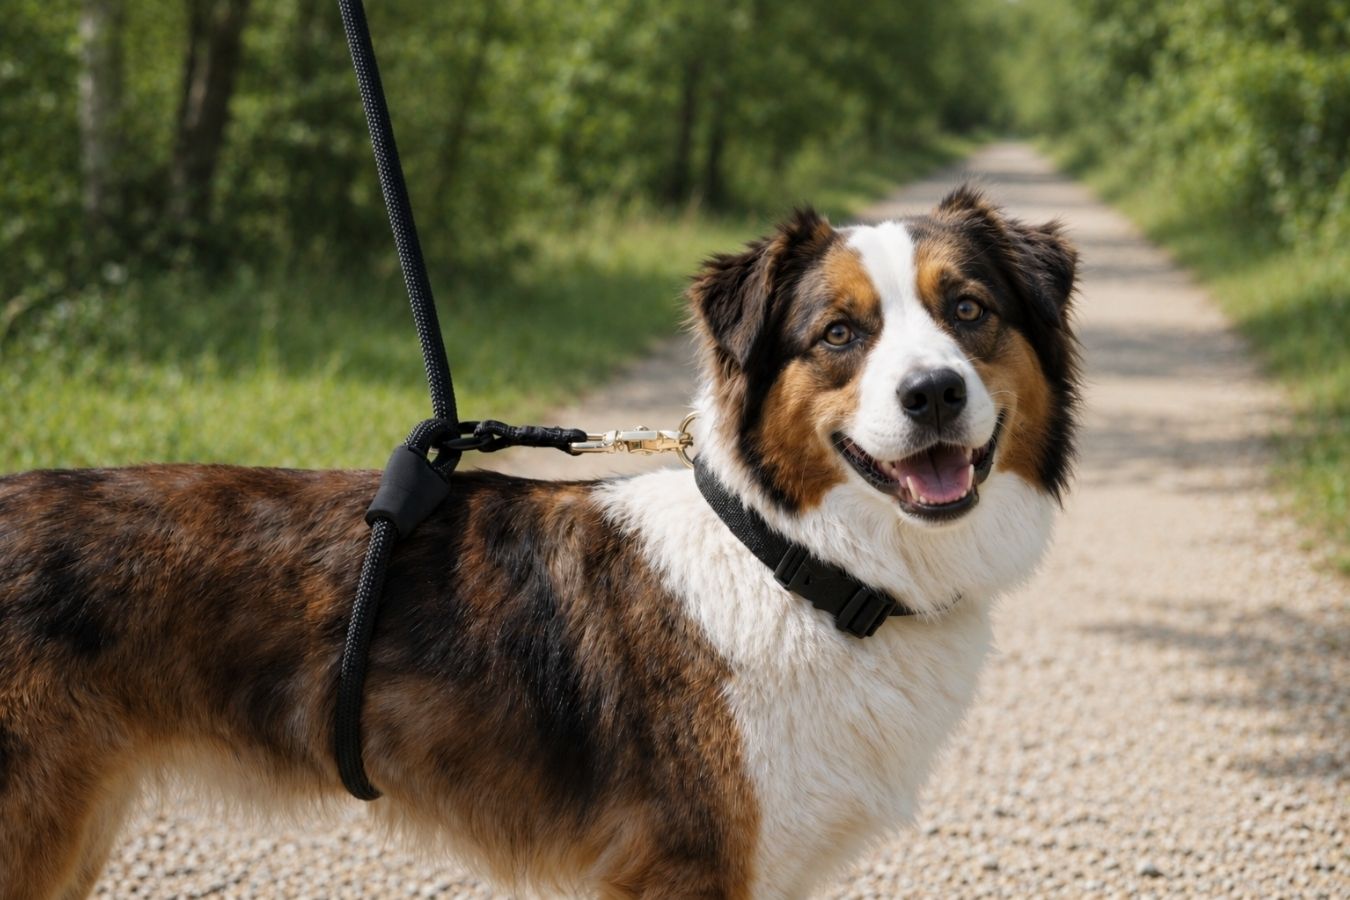
The Calm Command uses a wrap-around body mechanism to gently redirect pressure away from your dog's neck and across their torso when they pull. Unlike a harness — which many dogs learn to lean into and pull against with their full weight — this interrupts the pulling motion naturally, helping your dog self-correct without any yanking.

Step-by-Step Setup
Using the collar clip, attach the leash to the back ring of your dog's collar. If your dog wears a harness, clip to the top clip instead.

Bring the leash underneath your dog's body, positioning the flank webbing section just behind their front legs. This is the most common and effective placement.

Take the leash and clip it into the oval carabiner. This closes the loop around your dog's torso and activates the wrap mechanism.

The wrap should sit loosely around your dog's body when they are not pulling. It should not stay cinched tight against them at rest. If it feels snug, adjust placement or length.

Walk using the padded handle as you normally would, or clip on the hands-free belt for added freedom. Use the S-hook carabiners to attach any accessories before heading out. See the sections below for more detail.

Your First Walk
On your first walk, your dog may slow down or pause — that's a good sign. They're processing the new feedback from the leash. Here's how to make the most of those early moments:
- Start somewhere calm. Before heading into high-distraction environments — other dogs, busy streets, parks — do a few low-key walks first. Let your dog learn what the leash is communicating before testing it in harder situations.
- When your dog pulls, stop. Don't yank back. Just stop and wait. The gentle torso pressure does the communicating — let your dog feel it and figure it out.
- When they pause or check in with you, reward them. The moment they release pressure or look back at you, give a treat or calm praise. This builds the connection faster than anything else.
- Notice the shift. Pressure moves from the neck to the torso. There's no yanking — just natural guidance that your dog will understand more with every walk.

Using the Hands-Free Belt
The included hands-free belt fits a human waist of 24 to 44 inches. To use it, clip the belt to the leash handle and fasten it around your waist — you're now free to walk, run, or hike without holding the handle.

Walking Two Dogs
You can attach a second leash to the waist belt using a separate carabiner, or loop the handle of a second leash through the belt before closing it around your waist.
Using the Belt as a Brief Tether
In a pinch, the belt can be looped around a tree, post, or pole for brief stationary moments — like grabbing the mail or sitting at a café. Always keep your dog in close sight and full attention when doing so.
Adding Accessories
The small S-hook carabiners on the leash make it easy to attach accessories — poop bag dispensers, treat pouches, keys, or anything else you like to carry on a walk. Just clip on and go.

Care & Important Reminders
- Always unwrap the leash when your dog is resting, lying down, or unsupervised.
- The wrap communicates through gentle movement — it should never stay cinched tight when your dog is not actively pulling.
- Supervise your dog any time the wrap is in use.
- Periodically check all hardware — carabiners, collar clip, and S-hooks — for wear or damage.
- Wipe down with a damp cloth as needed. Avoid soaking or machine washing.
Adjusting the Leash Length
The leash includes an adjustable section that lets you customize your walking distance. Slide the adjuster to shorten or extend based on your preference and environment.
- Without the wrap (collar clip only): adjusts from 63 inches (about 5.25 ft) to 84.5 inches (about 7 ft).
- With the wrap in use: your dog's girth determines how much of the 34-inch wrap section is used. Whatever remains adds to your total walking length. The adjustable section always adds an additional 25–45 inches on top of that.
Wrap Placement
Most owners find placement just behind the front legs works best. Some find the stomach area more effective for their dog. Both are valid — the wrap works through gentle pressure awareness, not squeezing, so you can experiment to find what works best for your pup.


